





How to Uninstall IE11 from Windows 10
ເຜີຍແຜ່ເມື່ອ: 23 ມ.ສ. 2019 · ຝ່າຍສະໜັບສະໜູນ · 1 ນາທີອ່ານ
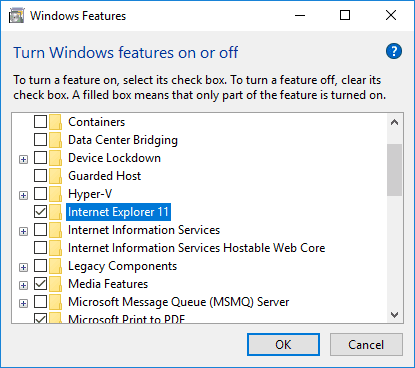
Automatic updates in Windows 10 always include Internet Explorer 11. You cannot simply stop this from happening when using Windows 10.
In case you have any compatibility problems when visiting websites or web applications in IE11, you can use Compatibility View.
However, if you don’t want to have IE11 on your system, it’s possible to uninstall it. Remember that you cannot use lower versions than IE11 on Windows 10.
If you want to uninstall IE11, please do the following:
- Go to “Control Panel”.
- Open “Programs” (or “Programs and Features”).
- Click “Turn Windows features on or off”.
- Uncheck “Internet Explorer 11” and click “OK”.
- Click “Yes” on the warning about Turning off Internet Explorer 11.
After completing these steps, uninstallation process will commence and you will need to restart your computer. Internet Explorer will no longer be installed once your system restarts.
If at any time you want to bring IE11 back, just access the same window and check the box next to “Internet Explorer 11”.
ບົດຄວາມທີ່ກ່ຽວຂ້ອງ

การปิดการอัปเดตอัตโนมัติใน Windows 10
ເຜີຍແຜ່ເມື່ອ: 23 ກ.ລ. 2026
ອ່ານບົດຄວາມ
วิธีป้องกันเว็บแคมจากการถูกแฮ็ก
ເຜີຍແຜ່ເມື່ອ: 23 ກ.ລ. 2026
ອ່ານບົດຄວາມ
อะไรคือโปรแกรมสแกนไวรัสออนไลน์ และการล้างไวรัสในคอม (Online Virus Scanner)
ເຜີຍແຜ່ເມື່ອ: 23 ກ.ລ. 2026
ອ່ານບົດຄວາມ
การเพิ่มความเร็วให้กับ Windows 10
ເຜີຍແຜ່ເມື່ອ: 23 ກ.ລ. 2026
ອ່ານບົດຄວາມ